Reference: EMF User’s Guide
If you haven’t already done so, follow the instructions in Section 2.1.1 to check your Java installation and Section 2.2 to install the EMF Client.
Once you’ve launched the EMF client, create your user account as described in Section 2.3 and log in.
Open the Dataset Manager from the main Manage menu by selecting Datasets (see Figure 2-12). It will take a little while for the window to appear since the EMF client is pulling the list of available dataset types from the EMF server.
In the Show Datasets of Type pull-down menu, select “All” to show all the datasets that have been imported into the MARAMA EMF server. This will take a little while for the EMF client to get the information from the EMF server.
You should see about 420 different datasets. Expand the Dataset Manager window so you can see more columns of information.
The table that the Dataset Manager uses to display the list of datasets is called the Sort-Filter-Select table in the EMF. This type of table is used throughout the EMF client application to display lists of items that you will interact with. We’ll try out some of the features of this table. You can find more detailed information in Section 2.5.6 of the User’s Guide.
First, look at the info line displayed at the bottom of the table. Initially it should be something like:
422 rows : 12 columns: 0 Selected [Filter: None, Sort: Last Modified Date(-)]
This info line tells you how many rows and columns are in the table, how many rows are selected, if you have any filters applied, and how the rows in the table are currently sorted.
By default, the datasets are sorted by Last Modified Date with the most recently modified datasets at the top of the list (descending order). Clicking a column header will resort the table by the values in that column. If you click the header corresponding to the current sort column, it will reverse the sort order. Click the Last Modified Date header to reverse the sort order of the dataset list. Now the datasets with the oldest Last Modified Date are at the top of the list (ascending order). The info line now reads:
422 rows : 12 columns: 0 Selected [Filter: None, Sort: Last Modified Date(+)]
Notice that the “-” has changed to “+” indicating the sort order.
What if you want to sort the datasets using multiple columns? You can set up additional sort options by clicking the Sort toolbar button which is the left-most toolbar item above the table. See Section 2.5.7 of the User’s Guide for a screenshot. You can also use your mouse to hover over each toolbar item and a tooltip will pop up for each item. Click the Sort toolbar button to bring up the Sort Columns dialog.
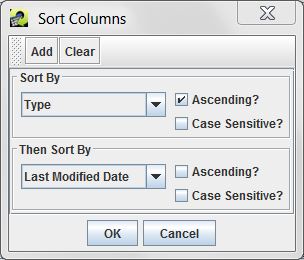
Let’s use some custom sort options to figure out which Flat File 2010 Nonpoint inventory has the latest Last Modified Date in 2013. In the Sort Columns dialog, set the Sort By pull-down menu to Type. Make sure the Ascending? checkbox is checked.
Next, click the Add button to add a second sort option. In the Then Sort By pull-down, select Last Modified Date and uncheck the Ascending? checkbox. Once the options are set, the Sort Columns dialog should look like:
Click OK to close the Sort Columns dialog and return to the newly resorted Dataset Manager window. The info line should now read:
422 rows : 12 columns: 0 Selected [Filter: None, Sort: Type(+), Last Modified Date(-)]
In the dataset list, the datasets are now grouped by Dataset Type. Within each dataset type, the individual datasets are listed by Last Modified Date with the most recent dates listed first.
In the toolbar, the item to the right of the Sort button is the Filter Rows toolbar button. See Section 2.5.8 for a screenshot or hover over the buttons to see the tooltips. Click the Filter Rows button to open the Filter Rows dialog.
You can create custom filters to limit which rows are displayed in a Sort-Filter-Select table. We’ll create a filter to only show datasets whose dataset type contains the word “Inventory”. In the Filter Rows dialog, click the Add Criteria button to create a new filter rule.
Click the cell directly under the Column Name heading; this cell initially is set to Name. A pop-up menu will appear and you’ll select Type. Next, click the cell underneath Operation to see the list of available options. We’ll leave the Operation as “contains” since we want to only show datasets whose dataset type contains the word “Inventory”.
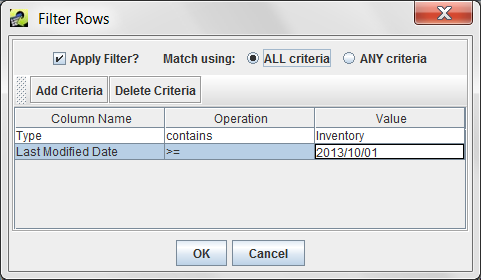
Then, click the cell under the Value column header. In this cell, you’ll type in your filter value. Type Inventory in the cell. Note that filters are case-sensitive. Finally, make sure the Apply Filter? checkbox is checked. Once the options are set, the Filter Rows dialog should look like:

Click the OK button to close the Filter Rows dialog and return to the now filtered list of datasets. Notice that the info line is updated based on your filter:
106 rows : 12 columns: 0 Selected [Filter: Type contains Inventory, Sort: Type(+), Last Modified Date(-)]
The table now only has 106 rows because those are the datasets that matched the filter. Note that our custom sort ordering has been preserved.
Let’s further filter the list of datasets to only show inventory datasets that have been modified since October of 2013. Click the Filter Rows toolbar button to reopen the Filter Rows dialog. Click Add Criteria to add another filter rule. For this rule, set the Column Name to Last Modified Date, the Operation to >= (greater than or equal to), and the Value to 2013/10/01. Make sure the Match using: radio button is set to “ALL criteria”. Once the options are set, the Filter Rows dialog should look like:
Click OK to return to the Dataset Manager. Our list of datasets has been filtered even further. Once again, the info line is updated:
63 rows : 12 columns: 0 Selected [Filter: Type contains Inventory, Last Modified Date >= 2013/01/01, Sort: Type(+), Last Modified Date(-)]
Our list contains only the datasets that meet both of our filter rules. Let’s switch it so that we see datasets that match either rule. Click the Filter Row button and change the Match using: radio button to “ANY criteria”. Click OK.
Now the dataset lists contains 388 rows because we’re seeing all the datasets whose dataset type contains “Inventory” plus all the datasets whose Last Modified Date is October of 2013 or later.
What if we want to remove our custom filters? Click the Filter Rows toolbar button to display the Filter Rows dialog again. Click on any cell in the filter rule you want to delete. Then click the Delete Criteria button to delete the filter. Go ahead and delete both filter criteria that we set up. Important! Make sure to set the Match using: radio button back to “ALL criteria”. Click OK. You should see the full list of about 100 datasets once again.
Note that any custom sorting or filtering you do is not permanent. If you close the Dataset Manager window and reopen it from the Manage menu, the datasets will once again be listed in the default sort order (Last Modified Date descending) with no filters applied.
The MARAMA datasets are organized by project. Click the Project column header to sort the datasets by project name. You should see files grouped by Project. “2011 USEPA Modeling Platform” is one of the projects.
In the “2011 USEPA Modeling Platform”, find the dataset named “oilgas_2011NEIv1_nonpoint_20130911_11sep2013_v0.csv”. Check the box next to the dataset name in the Select column and click the View button in the lower left corner of the Dataset Manager window to view the properties of the dataset. It may take a little while for the Dataset Properties View window to appear while the EMF client loads data from the EMF server.
Switch to the Data tab in the Dataset Properties View to see some information about the versions of this dataset. Currently, there is only one version of the dataset.
Click the View button near the top of the tab to view the raw records of the dataset. The first 100 records will be displayed. Use the scroll bar at the bottom of the Data Viewer to scroll to the right and see all the columns of data.
The format for the FF10 nonpoint inventory file format is available at
https://www.cmascenter.org/smoke/documentation/3.5.1/html/ch08s02s04.html#d0e40611
Close the Data Viewer window and the Dataset Properties View window and return to the Dataset Manager.
Scroll through the list of available datasets.
There are three temporal cross reference datasets imported into the EMF in the 2007 v3 EI project. Which one has the most records? Tip: you can select multiple datasets in the Dataset Manager by checking the Select checkbox next to each dataset’s name. Then, when you click the View button the EMF will open the Dataset Properties View window for each selected dataset. You can find a list of all the windows you have open in the Window menu at the top of the EMF application. [MARAMA_amptref_v3…]
Using the list of common dataset types in Section 3.2.1 of the User’s Guide, find the dataset that lists surrogate codes and descriptions. What is the dataset’s name and what project is it associated with? [MARAMA_srgdesc_36km…, 2007 v3 EI] Which surrogate code has the description “Golf Courses”? [850]
Last updated: September 29, 2014